

Aplications
ZipaTile is an Android based device, which means that you can install practically any Android based application on it. However, due to the security and reliability of the device, it is highly recommended not to install any third party applications on ZipaTile.
Home page
Home page is showing the most important information regarding internal and external conditions, security alarm state and time, as well as links to essential ZipaTile applications.
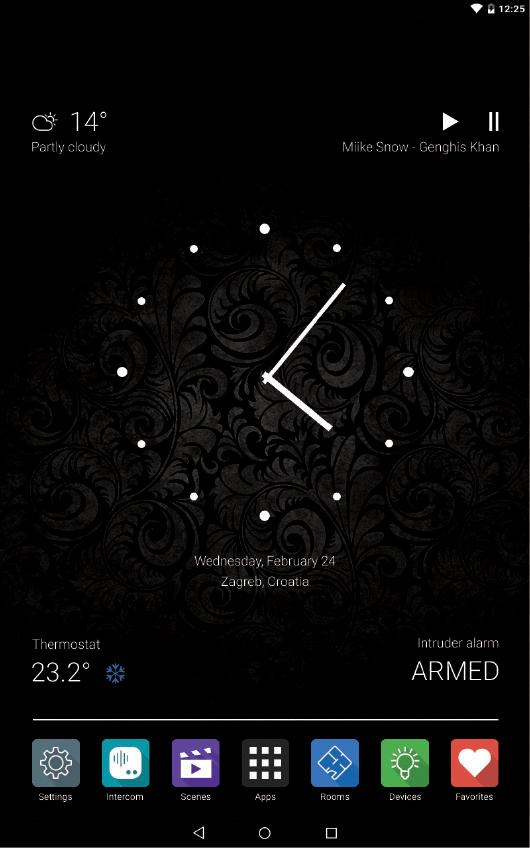
Figure 12. Lock screen
-
Security widget Showing the status of the Zipato security partition. You can change the status by pressing it, or by pressing the button aside of Security widget
-
Thermostat widget Showing the status of the Zipato thermostat. You can change the status by pressing it, or by pressing the button aside of Thermostat widget
-
Clock widget You can set alarm or changing parameters of the clock, by just pressing it once, or by pressing the button aside.
-
Weather widget Showing the current weather condition outside. You can check more details related to current weather and weather forecast by just pressing it or by just pressing the button aside.
-
Calendar widget Showing current date and day. Pressing it will open up the calendar application where you can manage your activities and reminders.
- Music widget It shows the song which is currently playing, and you can play, stop or skip the song right from the home page.
Intruder alarm
ZipaTile has the Intruder alarm system built in. Once activated, Intruder alarm will activate the siren and send alert messages to your phone and email whenever ZONE (sensor) has been triggered.
You can start using Intruder alarm immediately upon ZipaTile installation, as all sensors within ZipaTile are already included in it as ZONES (motion sensor, noise sensor level > 3).
Also, you can add any number of additional sensors as ZONES into your Intruder alarm system later on.
In order to add sensor as a ZONE in your Intruder alarm system, you have to first add sensor into your Zipato system (go to ADD NEW DEVICES wizard).
Controlling
Your can control the Intruder alarm from within Home page (press the current status of Intruder alarm) or through Devices application:
-
ARM AWAY - activates the system when leaving home. In this case any ZONE (sensor) will activate an alarm when it triggers.
-
ARM HOME - activates the system while staying at home. In this case only ZONES (sensors) which are set as PERIMETER (ordinary door/window sensors) will activate the alarm when they trigger. INDOOR sensors (mainly motion sensors) will not trigger an alarm, so users can freely walk within home.
- DISARM - deactivates the system. In this case no ZONE will activate the alarm.
In order to control Intruder alarm, you have to enter PIN code. Default PIN code is 0000. You can change your PIN code if you go to Intruder alarm settings.
Alerting
When Intruder alarm has been triggered, siren will be activated in order to warn the intruder and you will be alerted by an emergency PHONE CALL (your mobile number will be used). At the same time, you will get an EMAIL ALERT with 2 photos attached from the built in camera. You can change alerting setup from within Intruder alarm settings.
Alerting messages will only be sent if ZipaTile is connected to the Internet.
Settings
You will find Intruder alarm settings within Zipato admin portal at my.zipato.com > Security > Intruder alarm. In order to setup your system properly, you have to have an active Internet connection.
Safety alarm
ZipaTile has the Safety alarm system built in already. Comparing with the Intruder alarm, Safety alarm is ARMED all the time and it should be only DISARMED for the service and maintenance purposes.
ZipaTile’s built-in NOISE SENSOR is pre-configured as a ZONE, so when noise level reaches 7 for more than 15 seconds, Safety alarm will be triggered. This way, you can rely on any of your existing SMOKE or other safety sensors which have SIREN built in.
You can add additional safety sensors as ZONES into your Safety alarm. However, in order to add sensor as a ZONE in your Safety alarm system, you have to first add sensor into your Zipato system (go to ADD NEW DEVICES wizard).
Alerting
When Safety alarm has been triggered you will be alerted by an emergency PHONE CALL (your mobile number will be used). At the same time, you will get an EMAIL ALERT with 2 photos attached from the built in camera. You can change alerting setup from within Safety alarm settings.
Alerting messages will only be sent if ZipaTile is connected to the Internet.
Settings
Safety alarm settings you can find within Zipato admin portal at my.zipato.com. Go to Security > Safety alarm. In order to setup your system properly, you have to have an active Internet connection.
Elderly care alarm
Elderly care alarm is working quite similar to Intruder alarm. However, compared to the Intruder alarm, Elderly care alarm system is triggered in an opposite way. Instead of being triggered when a ZONE detects some activity, Elderly care alarm will be triggered when not even one zone detects any activity for a certain period of time (default period of time is 15 minutes).
Alerting messages will only be sent if ZipaTile is connected to the Internet.
Settings
Safety alarm settings you can find within Zipato admin portal at my.zipato.com. Go to Security > Safety alarm. In order to setup your system properly, you have to have an active Internet connection.
Smart Thermostat
ZipaTile is the fully featured thermostat unit. However, since there are many types of heating/cooling systems out there, ZipaTile should be specially adjusted for each particular setup.
Device Manager
Depending on the communication protocol supported (ZigBee, Z-Wave…), ZipaTile can connect and control various smart devices in your home. This way you can use ZipaTile to control your lights, blinds, curtains, read status of meters, sensors etc…
You can also create ROOMS in Zipato DEVICES and assign a room to each device. This way you can easily find and manage devices within one room.
GO TO HOME PAGE > DEVICES
or
GO TO HOME PAGE > ROOMS
In order to connect smart device based on certain communication protocol (Z-Wave, ZigBee…) go to DEVICES -> SETTINGS -> ADD NEW DEVICE
Scenes
When using your ZipaTile for controller your lights, curtains, blinds etc…, you can use SCENES application in order to control your devices faster and easier.
Scenes are the most basic level of automation. Scene is just a group of devices set to the certain state (on, off, 30%, etc…). Once you call the scene by pressing the scene button, all devices in that group will go to that certain state. You can create a scene if you go to HOME PAGE -> SCENES -> ADD NEW SCENE
Rules
Rules are advanced and powerful automation option. Zipato Rule Creator is a programming language specially made for the purpose of device automation. Although extremely powerful, it is completely graphical and very easy to use, without any previous programming experience.
Since Zipato Rule Creator is offering many options, and it is based on drag and drop, it is highly recommended to use it on PC rather than on ZipaTile itself. In order to use Zipato Rule Creator go to: my.zipato.com > rule creator.
Whenever you create or modify your rules within Zipato Rule Creator, click SYNCHRONIZE RULES. This way all your Rules are transferred to your ZipaTile and they will run locally on it, no matter of the internet connection with Zipato servers.
Cameras
ZipaTile has built in 2.0Mps camera for the purpose of basic monitoring, photo/video alerting and video communication. If you want live video of higher quality, you can connect any of supported third party’s IP cameras to your ZipaTile, and you will have exactly the same functionality as with the built in camera. To connect new IP camera to ZipaTile, go to my.zipato.com > add new device > ip cameras
Live view
Download and install Zipato application from Google Play store for Android based devices or Apple store for iOS based devices. Use your Zipato username/password to login and you will be able to see the live video from your ZipaTile on you Android or iOS device.
You can do the same on your web enabled PC, if you go to my.zipato.com and select Cameras in the left menu.
If you connect more cameras to your ZipaTile, you will be able to see the live video from all of them.
Alerting
Built in camera is already pre-set in Intruder alarm, Safety alarm and Elderly care alarm systems to send the photo alerts.
If you want to add some additional IP cameras to do the same, you can do it by first connecting cameras to your ZipaTile, and then adding camera to a particular alarm system.
Additionally, if you want to receive photo or video clips according to some custom conditions, you can use RULE CREATOR to set these conditions.
Intercom
ZipaTile features both SIP server and SIP client. Zipato Intercom could be used for communication between Zipato Intercom Clients and supported SIP based door phone units (please advise [www.zipato.com](http://www.zipato.com) for the list of supported units).
When ZipaTile is connected to Internet, communication between clients could be done worldwide.
Intercom Server setup
Each ZipaTile features the Zipato Intercom Server. However, only one Intercom Server can be enabled within your Zipato network. In order to enable one Intercom Server, go to device manager > settings > networks > ip > and click "enable" on the SIP server with the serial number of your ZipaTile (the one which you would like to be your Intercom server).
After enabling the Zipato Intercom Server, you will be able to find "Intercom" option in the main menu. Over there you can check basic Intercom settings and manage Intercom Clients, Servers, and create Groups.
Intercom Client setup
Basically, any SIP based device or application can be used as Zipato Intercom Client.
There are 3 types of Intercom Clients:
-
Zipato User Client - any SIP application used by you or your member users within your Zipato system
-
Door Phone - any supported SIP based door phone unit properly configured for use with Zipato Intercom
- Contact, any …?
User Client setup
User clients are being enabled automatically whenever enabled User connects with it to the Zipato Intercom Server. User has to use Zipato credentials to connect to Zipato Intercom from within the SIP application. SIP application has to be set to connect to Zipato Intercom Server. Zipato Intercom Server details can be found at your controller settings > intercom > general
Door Phone setup
In order to connect supported SIP based door phone to Zipato Intercom, you have to first add door phone as the client:
go to your controller settings > intercom > add new > doorphone
once after door phone has been added to the clients list, click the "details" button on it in order to check URI and USERNAME/PASSWORD generated automatically.
Afterwards, use these info to properly setup your door phone.
More detailed instructions about setting up Zipato Intercom you can find online at www.zipato.com/support.
Weather station
ZipaTile Weather station is using the weather service from [www.weatherunderground.com](http://www.weatherunderground.com). You can get the Weather information by touching the current temperature information on your ZipaTile Home Page.
Weather information are available within Zipato Rule Creator which means that you can create automatic rules based on weather status or forecast.
Calendar
Calendar application is available if you press the Date information on your ZipaTile Home Page. You can set calendar appointments and tasks.
Clock
Clock application is available when pressing the Time information on your ZipaTile Home Page. You can set various time zones and alarms.
In order to set the Right Time Zone, go to Settings > Date&Time and select your timezone manually.
Music player
Music player application is available from within the Application menu. You can use Zipato Music player to listen music on ZipaTile, or any bluetooth speaker connected to the ZipaTile. To connect your Bluetooth speaker to ZipaTile, go to Settings > Bluetooth