

Installation and Setup
Unpacking the ZipaTile
The ZipaTile packaging contains the following items:
- ZipaTile
- ZipaTile wall holder (attached to the ZipaTile)
- AC/DC Power supply
- Plug in extension for a wall socket
- Wall mounting kit: Four screws and screw anchors, H7 plug with optional separate wire terminals (2 male and 2 female), zip ties
- Quick installation guide
Installation of in-wall power adapter has to be carried out by a professional electrician.
Optional Tools which may be needed:
- Screwdrivers: Flathead and Philips
- Pliers
- Wire stripper
- Non-contact voltage detector
- Wire cutter
- Electrical tape
- Drill and drill bits appropriate for the wall type
Overview
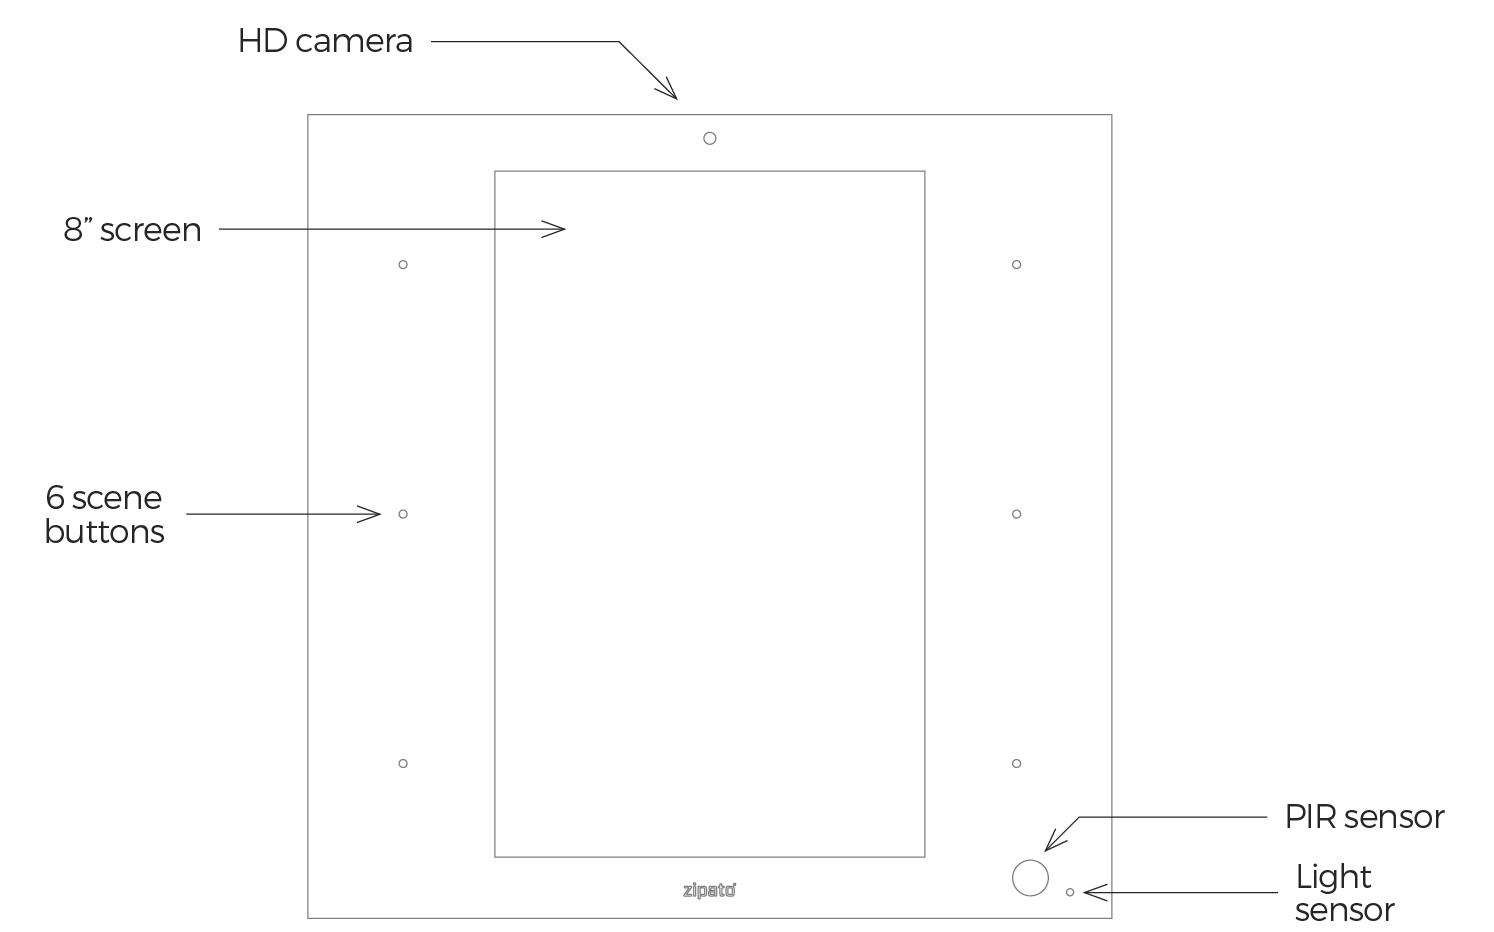
Figure 1. ZipaTile front view
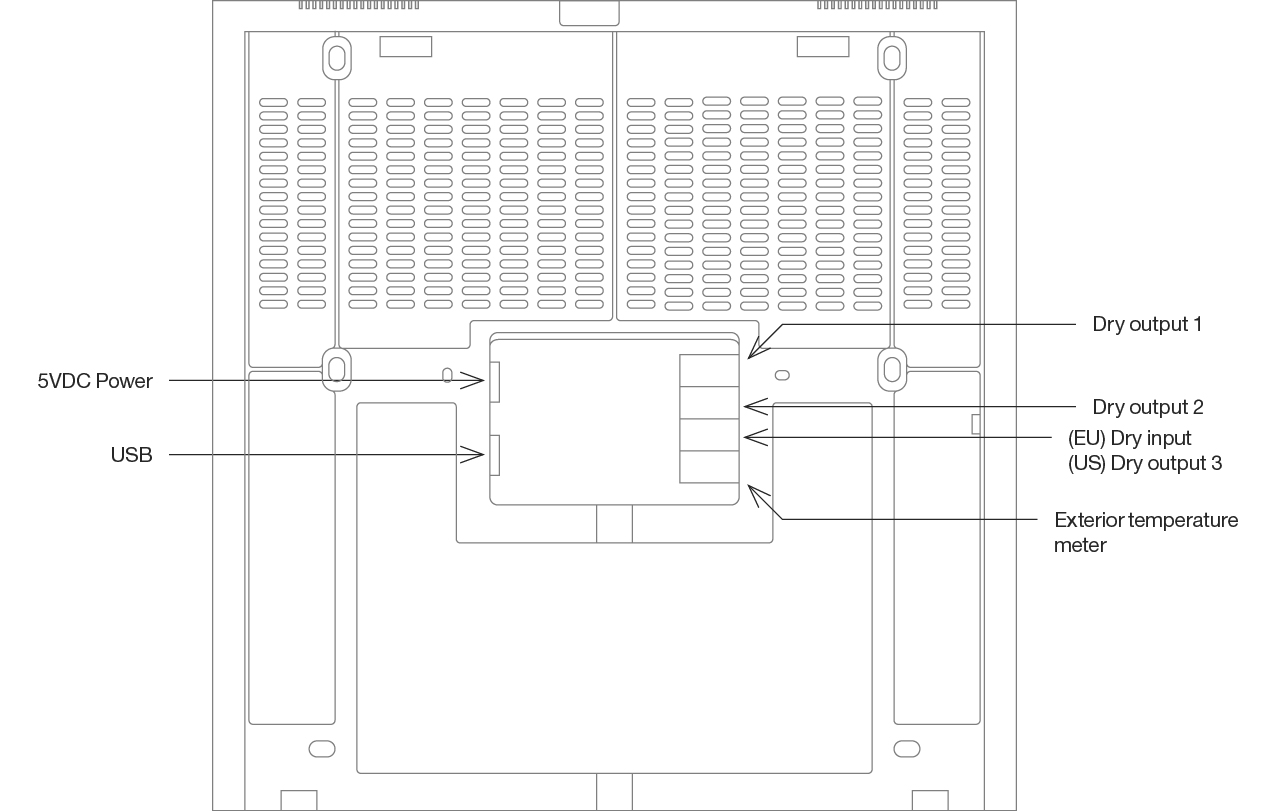
Figure 2. ZipaTile rear view

Figure 3. ZipaTile top view
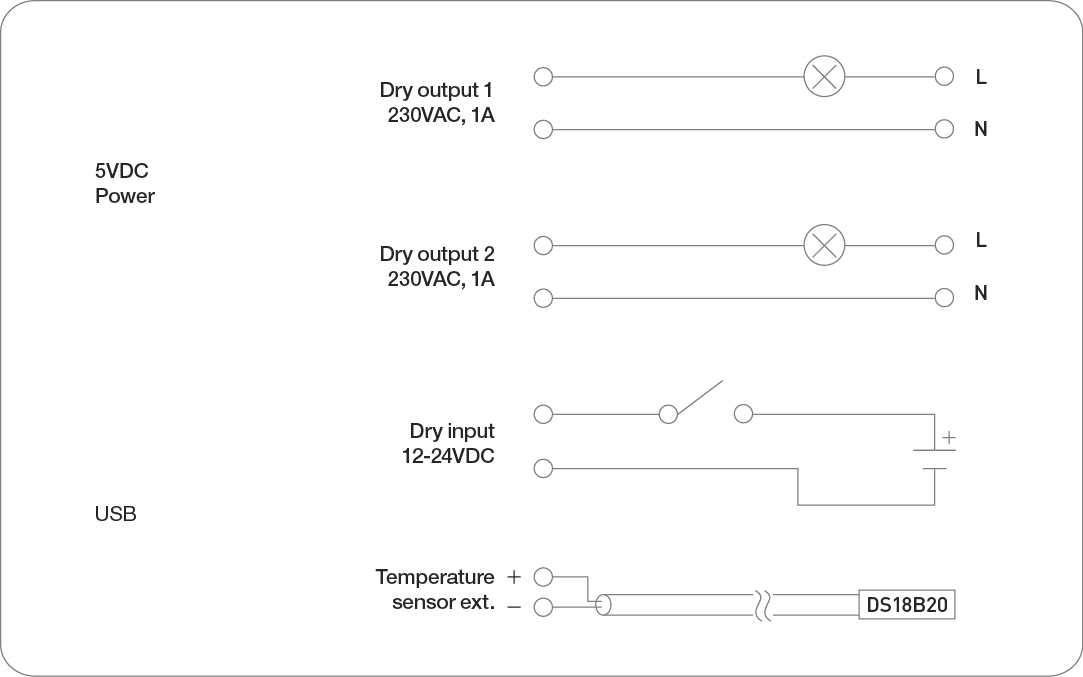
Figure 4. Wiring diagram (EU RU IN)
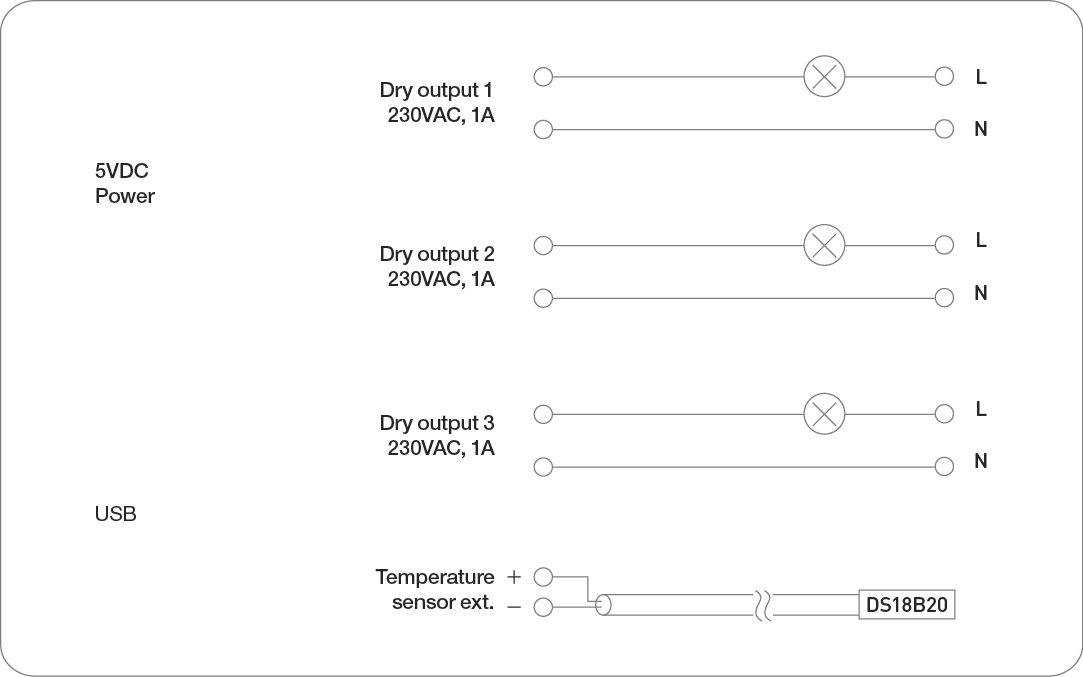
Figure 5. Wiring diagram (US IS AU)
Mounting
Table top
ZipaTile is primarily intended for on-wall mounting, but it can be used on table top as well. In this case, please keep the wall holder affixed to ZipaTile and use the built-in table top stand at the back of the wall holder. Just plug AC/DC adapter into free electrical socket and other side into the ZipaTile.
ZipaTile is primarily made for on-wall usage. Table top holder can’t resist strong touch pressure.

Figure 6. Zipatile table top mounted
Wall mount with built in power supply
This is a default way of using ZipaTile. It requires usage of in-wall power supply and a wall hole with the 110-220V power wire at the place where you want to mount the ZipaTile.
Press firmly wire socket to charger pins, clamps inside the wire socket need to be widened with pins by hand pressure for tight fit.
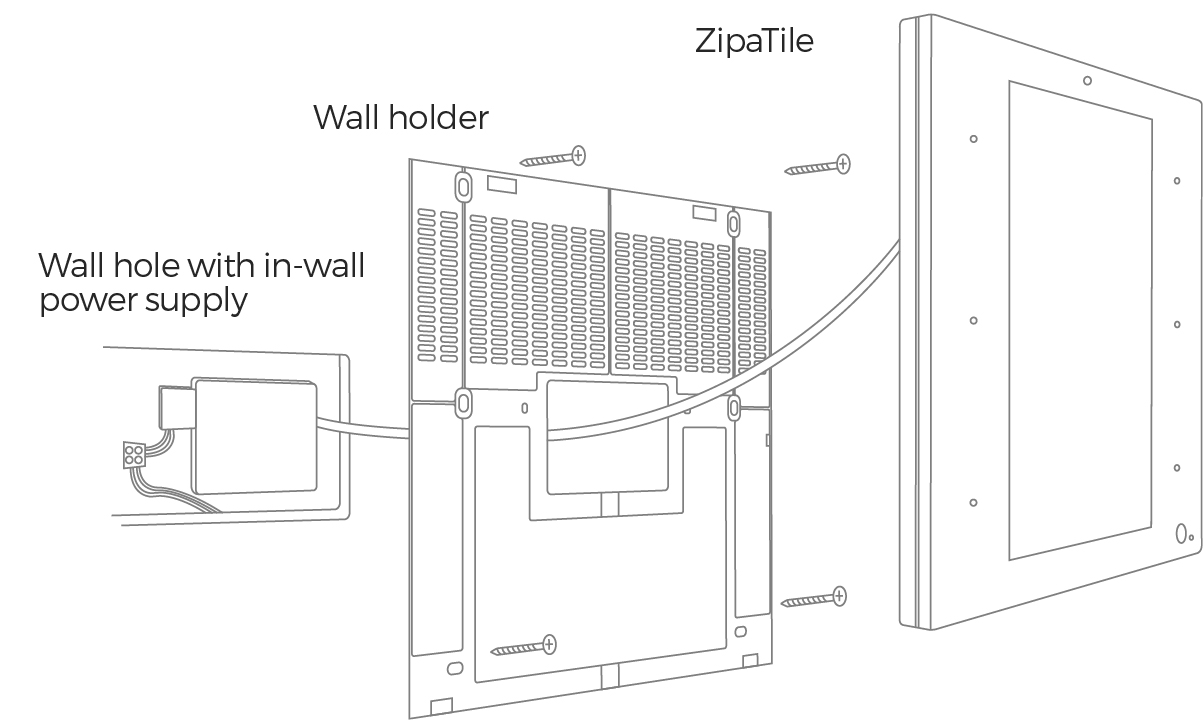
Figure 7. Installing the wall holder
Before performing any electrical work turn OFF the power to the AC wires leading into in-wall box at the main power source. Before starting installation make sure the power is really off by using a non-contact voltage detector.
Installations should be performed in accordance with all national and local electrical codes. If you are unsure or have questions about the installation, please seek an advice of a qualified electrician. Do not apply power to the ZipaTile before completing installation. Please make sure that a proper power cut-off device is part of your power supply circuit (electrical fuse).
Wall mount with plug-in power supply
If there is no in-wall box at desired mounting location, please use the wire channel at the back of the wall holder to place the power wires behind the ZipaTile and use the bundled plug-in power supply to connect to the wall socket.
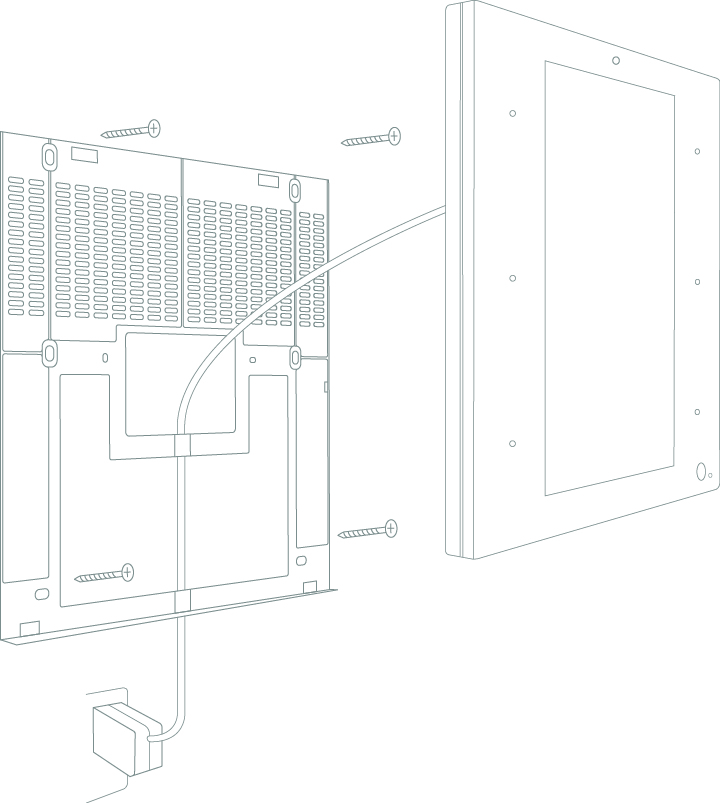
Figure 8. Powering the ZipaTile with plug-in power supply
Screen Protector Once after you are done with the installation, you can peel off the screen protection foil before the first use of ZipaTile.
Setting up your ZipaTile
Turn on the ZipaTile
Press and hold (3 sec) the power button on top of the ZipaTile. Booth process will start with the Zipato logo on the screen and it will finish when you see the ZipaTile lock screen.

Figure 9. Lock screen
To unlock the device, just swipe up from bottom of your screen.
You can add more users within ZipaTile Settings, and change your password. This way, each user can have it’s own look and feel of the ZipaTile. You can set special profiles for your family members, cleaning staff etc.
WiFi Internet connection
In order to configure your ZipaTile properly, ZipaTile has to be connected to Internet router over the WiFi.
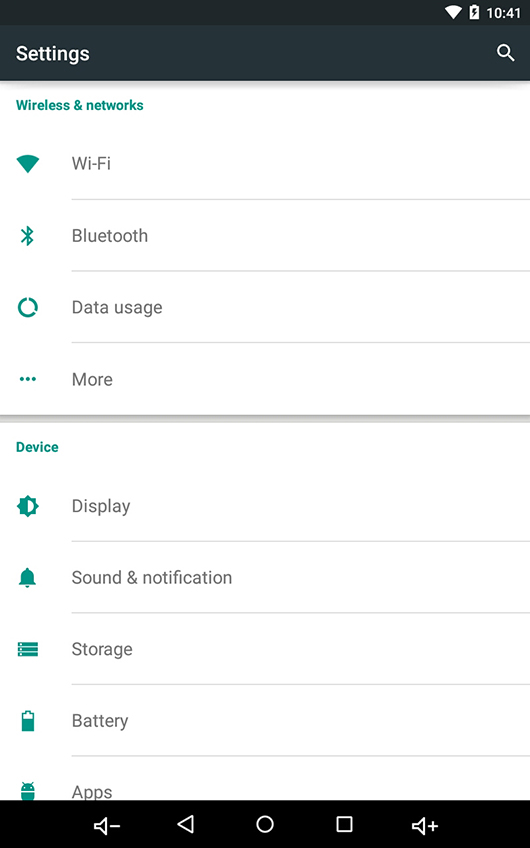
Figure 10. Settings screen
-
Open the Settings app.
-
Choose Wi-Fi. Choose Wi-Fi to view a list of available Wi-Fi networks on the right side of the screen. Otherwise, the list shows up full screen.
-
Choose a wireless network from the list. When no wireless networks are listed, you’re sort of out of luck regarding Wi-Fi access from your current location.
-
If prompted, type the network password.
-
Touch the Show Password checkbox so that you can see what you’re typing; some of those network passwords can be long.
- Press the Connect button. The network is connected immediately. If not, try the password again.
When the tablet is connected to a wireless network, you see the Wi-Fi Connected status icon. This icon indicates that the tablet’s Wi-Fi is on, connected, and communicating with a Wi-Fi network.
Some wireless networks don’t broadcast their names, which adds security but also makes connecting more difficult. In this case, touch the Add icon. This icon might also be labeled Add Wi-Fi or Manually Connect. To make the connection, type the network name, or SSID, and choose the type of security.
Zipato registration
At the home page, start ZIPATO application and select REGISTER. You will need to confirm your email address, and login to Zipato app afterwards.
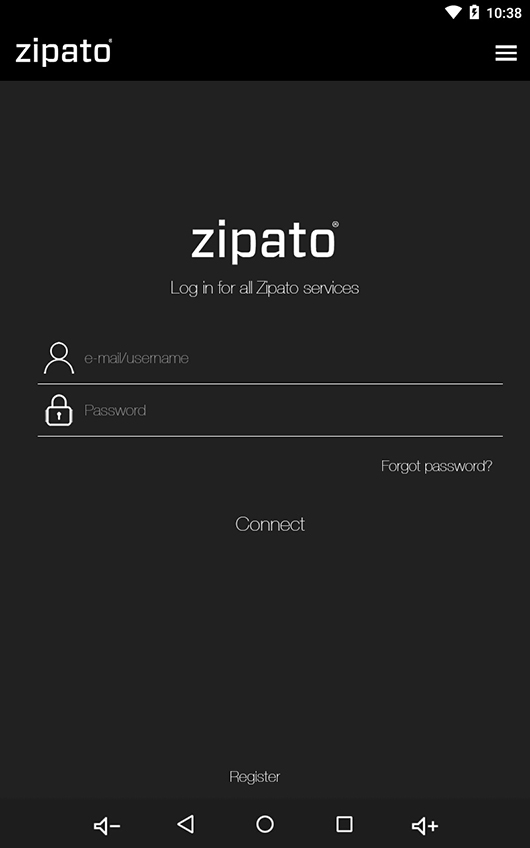
Figure 11. Registration
When login first time to Zipato application, you will be required to enter your mobile number and choose your location. This way you will be able to receive phone and SMS security alerts, as well as to get the local weather information on your ZipaTile.
Once registered and logged in to the Zipato application, ZipaTile will be automatically configured, and you will be able to see the thermostat, security and weather information on the home screen.
If you want to unregister yourself and restart the ZipaTile to factory default settings, go to ZIPATO APPLICATION > SETTINGS > MASTER RESET
After registration Zipatile will automatically self-configure and this process may cause lack of certain information within a first 10-20 minutes of using Zipatile.